Game: Warhammer Fantasy Battle 7th edition
Opponent: Gary
Scenario: Pitched Battle
1st turn: Warriors of Chaos
Points: 2000
Background: I decided to completely shake up my army ahead of this game. I really didn't care about winning or losing so I felt freer about changing things that on paper shouldn't work. I had a dim idea of picking the mark of each power on all my units over the next four games. I started with the Mark of Nurgle.
I had also had a long term idea of combining my two Warrior units into one super-unit. It weighed in at over 400 points on it's own. I wasn't convinced it would work but it sure looked cool.
Gary had also shaken up his Dark Elves and had included a fighty Lord rather than a level 4 Sorceress. The pointy eared git had a 1+ save, 2+ equivalent ward save then a 4+ regenerate save. Ooof!
The photos aren't great in this report because I forgot my camera and had to use my mobile phone.Warriors of Chaos- Sigurt Volsung, Lord on Daemonic Mount, Mark of Nurgle, the Father of Blades, Armour of Damnation, Enchanted Shield
- Thaer, Exalted, Mark of Nurgle, Additional Hand Weapon, Bronze Armour of Zhrakk, Shield
- Angur, Lvl 2 Sorcerer, Mark of Nurgle, Level 2, Power Familiar, Dispel Scroll (Magnificent Buboes and Rot, Glorious Rot spells)
- Boda, Lvl 2 Sorcerer, Mark of Nurgle, Level 2, Infernal Puppet (Magnificent Buboes and Fleshy Abundance spells)
- 20 Warriors, Shields, Mark of Nurgle, Musician, Standard - Banner of Wrath
- 16 Marauders, Shields, Light Armour, Mark of Nurgle, Musician, Standard
- 5 Knights full command, Warbanner
- 5 Marauder Horse, musician, flails
- 5 War hounds
- 5 War hounds
- Chariot
Dark Elves- Fighty Lord, 1+ save, 2+ equivalent ward save then a 4+ regenerate save, Strength 6 sword
- Lvl 2 Sorceress
- Lvl 2 Sorceress
- Lvl 2 Sorceress
- Assassin
- 2 Repeater Bolt Throwers
- 16 Spearelves full command
- 5 Dark Riders
- 5 Dark Riders
- 19 Executioners full command Banner of Murder
- Hydra
- Chariot
- Chariot
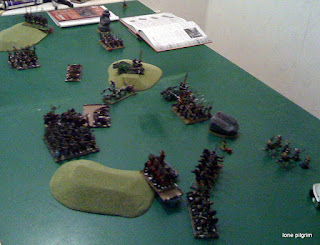
Terrain and DeploymentGary had sorted out the board again before I had arrived and this time it had three small hills in the middle section of the board and a few rocky columns. I abandoned my usual envelopment of one flank strategy and set up across my deployment zone. Still, I was stronger on my right where my Marauder Horse, Knights and big Warrior block (with my Lord and a Sorcerer) were facing off against the Dark Elf Bolt Throwers, a Dark Rider unit, a Sorceress, the Executioners and Lord. Gary's chariots were nearby too, while my Warhounds were in support. My Marauders lined up against the Spearelves. Both units included a Sorcerer and I also had my Exalted on this flank.
This looked like it would be a very different game to those we had played previously.
My plan was to overwhelm the right flank where I was projecting a lot of force over a very small area. I felt the Bolt Throwers were in a vulnerable position and could be swamped easily if I won first turn (I had the +1 bonus). I wanted to keep my Lord in the Warrior unit until turn three at least so that I could use my combat resolution to protect me from unfavourable challenges. In previous games I had charged him out too early and he was vulnerable. And finally, I wanted to snipe the Sorceresses and unit champions with Magnificent Buboes to reduce the Dark Elf magic.
The gameAfter a tense few roll-offs my Warriors would go first. Everything marched forward. I tried to angle my Marauder horse so that the Dark Riders would have to hit my Knights if they overran. I also angled my Warhounds in the centre to tempt the Hydra and Executioners into a charge. Their overruns, if they charged, would take them into my warrior block or into a position where I could get a flank charge.
In my magic phase Magnificent Buboes took a wound from the Sorceress in the Spearelves.
The Dark Elves moved forward in turn. One Dark Rider unit got in the face of my Knights while the other zoomed up the left flank to threaten my Marauders. Magic and shooting killed some Warhounds and a Knight.
The Hydra caused my central Warhound unit to run away. My Chariot and Warrior block shuffled up, turning slightly to face the Hydra. On the right my Marauder Horse charged the nearest Bolt Thrower. The crew fled and the machine was destroyed. In my following turns the Marauders went on to destroy the next Bolt Thrower and then hit the rallied crew from the first. After killing them they pursued off the table and only reappeared towards the end of the game.
Meanwhile my Knights charged the Dark Riders. They had to stay or they would have been destroyed by my Marauder Horse behind them. They lost four men and the survivor ran. He later returned to harass my Knights who were trying to reposition to help out my Warriors.
On the left my Exalted left the Marauders to protect their flank from the Dark Riders. The Warhounds to their right got in the face of one of the Dark Elf chariots. I hoped that although they would die they would keep the chariot away from the Marauders for a couple of turns.
My magic phase went from the sublime to the ridiculous. I killed the Sorceress in the Spearelves with another Magnificent Buboes but then miscast. The Dark Elves got to cast a spell of their own and blasted my Warrior block with the large template. In a blizzard of fives and sixes ten of my men died to failed toughness tests. Even my Sorcerer and Lord were wounded!
Close combat was joined across the battlefield. The Dark Riders moved in against my Exalted, the Spearelves charged my Marauders, one chariot charged my Warhounds and the other crashed into my Warriors. The Dark Elf Lord also charged out of the Executioners and into my Warriors.

The combats on the left went in my favour. The Exalted killed all of the Dark Elf light cavalry over two turns and then trudged off back toward the Marauders. The Marauders themselves survived the first wave onslaught of the Spearelves then won the second round. The Spearelves fled and were chased down by the Marauders.
Close by, the Chariot blitzed through my Warhounds, despite getting a one for impact hits, and turned to face down the Marauders in the final turns.
The Hydra was locked in a one on one struggle with my Chariot. It chased the Chariot right up to my table edge and then eventually destroyed it. It pursued off the table and then returned too late to contribute to the rest of the game.
My Warhounds rallied and then charged the lone Sorceress on the right. She had used her magic to buff herself up to four wounds. Although the doggies took two from her, she killed them all in an impressive combat display. She ran around the back of my engaged Warriors which allowed her to contribute some magic to the left flank in later turns.
The crucial action was taking place on the right, though. The Dark Elf Lord challenged Sigurt and took off a wound, taking none in return. The Chariot rolled a one for impact hits and only killed a single Warrior. It suffered a wound and that meant the Elves had lost the combat by a significant amount. The Lord and Chariot both ran. My Warriors pursued into the Executioners.
The Dark Elf Sorceress miscast and now I got a chance to automatically cast a spell. Rot, Glorious Rot was in range of several units but I rolled appallingly. Both the Chariot and Hydra were unharmed as I rolled a one for my strength, the Lord and Sorceress shrugged off their wounds and only the last Dark Rider succumbed. Rats.

Now the Assassin revealed himself and took on the heavily wounded Sigurt. The Armour of Damnation and Father of Blades combined to ensure that the Assassin killed himself! Sigurt miraculously survived and then gained +1 Toughness on the Eye of the Gods table (my first roll in three games).
To make matters worse for the Dark Elves the Executioners were now charged by my two remaining Knights (Dark Elf magic had killed two more). Sigurt butchered the champion quite handily while the Knights did for the Sorceress. The Executioners lost the combat and were run down. That also meant my Knights played little part in the game as they trampled the Dark Elves into the dirt.
By now the Dark Elf Lord had rallied and he charged back into single combat with Sigurt. Over three turns he killed the Lord and Sorcerer Angur but he kept losing the overall combat due to my ranks, outnumbering and standard. He didn't run, though, and his armour meant I couldn't hurt him. By the end of the game he was starting to chew through the Warriors but the combat was still ongoing.
Things looked very tight now, and the left flank could well decide the outcome of the entire game.
One of the Dark Elf Chariots had fled from my Warriors which allowed it to be charged by my Flail carrying Marauder Horse. They destroyed the Chariot and then ran over onto the left flank. It was a bad move by me and I got my units in a tangle. The lone Sorceress killed them all in two turns of crackling magic phases. It also allowed the last Chariot to get a charge on my Marauders. Again Gary rolled a one on the impact hits and little damage was caused. Combat continued as my Exalted tried to charge in but he failed his fear test. It didn't matter though as my Marauders won the combat again and this time the chariot fled.
The game was over and we had to tot up victory points to determine the result. Gary had killed almost 1200 points of my army and had captured a table quarter with his Hydra. He had also killed my General.
I had captured one quarter with my Marauders and had crucially taken two standards. My army had killed over 1400 points of Dark Elves.
Result: Win. 1713 Victory Points to 1380. Marginal Victory.
Learning points- That was a quite enjoyable game. There was lots of combat which could have gone either way and a lot of tense magic and manoeuvring. Even the luck was evenly distributed. I am pleased with how I set up the units on my right but by contrast I cocked up my movement on the left. I think Gary got as many things wrong as he got right too.
- I need to find a way to hurt that Dark Elf Lord if Gary continues to use him. Perhaps there is a combination of magic items my characters can use in their challenges?
- I wasn't blown away by the mark of Nurgle but it didn't seem a total points sink either. The magic was handy, especially Magnificent Buboes. Which mark to use next?


